Affiliate Disclaimer
Some links in this article are affiliate links. We may earn a small commission if you make a purchase through these links, at no extra cost to you. We only recommend products we find useful to our readersAsthma is a chronic disease that affects one’s regular process of breathing, making them hyperventilate and struggle with a ragged breathing. While the breathing pump is one’s best friend suffering from asthma, yoga asanas for asthma relief is believed to inflict long term effects in the process of recovery.
There often comes times when you hold back from certain activities with the fear that it will just induce yet another asthma attack which is definitely you wish to play around with. As much as you try to say no to the fact, it actually is the truth that asthma heftily affects one’s way of living and prohibits them from leading a quality life.
If you are finding yourself stuck in such situations, it is best to take a step back and try out yoga to treat asthma because of its flourishing and positive results. In this article, we are going to be discussing the top yoga asanas to cure asthma that you can master with gradual practice.
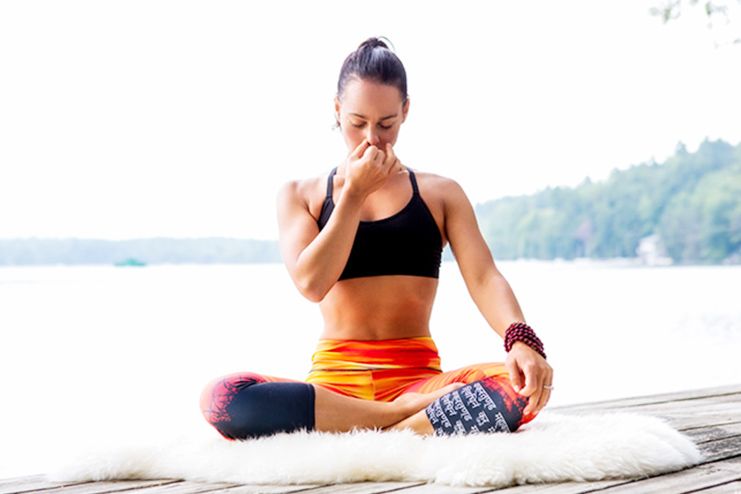
1. Nadi Shodhan Pranayama

Video link:
Etymology
Nadi – Shodhan – Pranayama
Nadi – Subtle Energy Channel
Shodhan – Purification
Pranayama – Breathing Technique
The Nadi Shodhan Pranayama is a common breathing technique in the field of yoga (rather pranayama) which helps to clear the blocked “Nadis”, otherwise described as the energy channels in the nasal pathway. The clearing of this passage helps calm the mind and also channels the body with a good percentage of oxygen.
It is also known as Anulom Vilom Pranayam.
How Does it Help Treat Asthma?
This breathing technique helps patients suffering with asthma because not only does it clear out the nasal pathway, it also increases the capacity of the lungs, thereby ensuring that the person doesn’t suffer from shortness of breath and can actually breathe better.
How To Do?
- Spread a yoga mat on the ground
- Sit on the mat with your back and spine erect. Keep your shoulders relaxed.
- Relax your mind completely and try and sport a subtle smile on your face.
- Only your right hand plays a crucial role in this yoga pose for asthma. Place your left hand on your left knee, making sure that the palm of your hand is facing the ceiling.
- Next, place your index finger along with your middle finger in between the ridge between the eyebrows.
- Place your ring finger along with your little finger on your left nostril and place your thumb on the right nostril. It is the little and the ring finger which is used to open and close the nostrils.
- With gentle pressure, press your thumb on your right nostril and breathe out through the left nostril.
- Following that, breathe in the air through the left nostril and press your ring and little finger over it after that. Release your thumb from the right nostril and breathe out through the right nostril.
- Again, breathe in through the right nostril, close it with the thumb and breathe out through the left nostril. This entire account for one round of the asana.
- Continue doing this process with breathing in and out through alternate nostrils.
- Do the rounds for 9 times.
- Make sure to keep your eyes closed during the entire process and aggregate your concentration to one point.
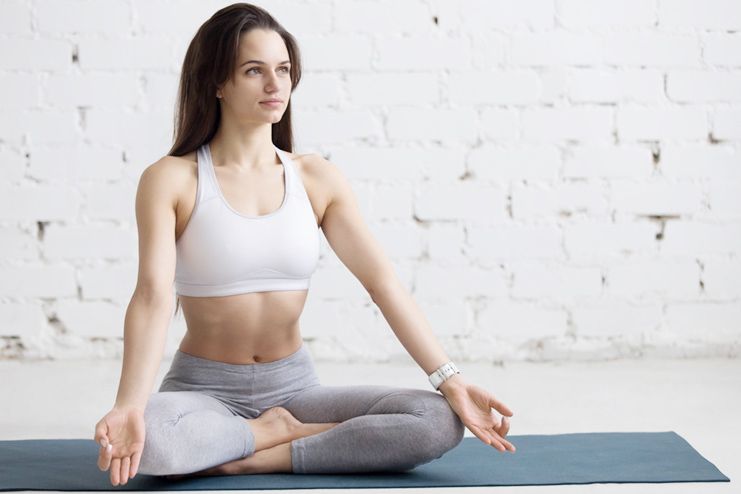
2. Kapal Bhati Pranayama

Video link:
Etymology
Kapal – Bhati – Pranayama
Kapal – forehead
Bhati – shining
Pranayama – breathing technique
The Kapal Bhati Pranayama is yet another form of breathing technique which accounts for one of the most effective yoga poses to keep asthma at bay. While many people often tend to just focus on the action of the belly, the breathing technique along with it helps flush out toxins from the body, thereby purifying the body in the process.
How Does it Help Treat Asthma?
While the majority of problems relating to asthma roots from the respiratory system and the obstructed functions of it, this asana helps keep that at bay. It is regarded as one of the most effective yoga poses to relieve asthma because of how well it detoxifies the body and gets rid of any harmful chemical that could possibly trigger asthma.
How To Do?
- Get a yoga mat and place it on the ground.
- Sit on the mat with your back erect and your spine completely straight. Place your palms on your knees, making sure that they are facing the ceiling.
- Take a deep breath in through your nose.
- As you are about to exhale, pull your stomach in towards the direction of the spine as much as your body permits; never overdo it. If needed, you can even put your palm on the stomach to feel the abdominal muscles.
- Gradually relax your navel and abdomen and this is where the air fills in the lungs.
- Do this complete process for 20 times continuously to complete one round of Kapal Bhati Pranayama.
- After the first round, relax for a few minutes with your eyes closed.
- Repeat the entire process two more times.
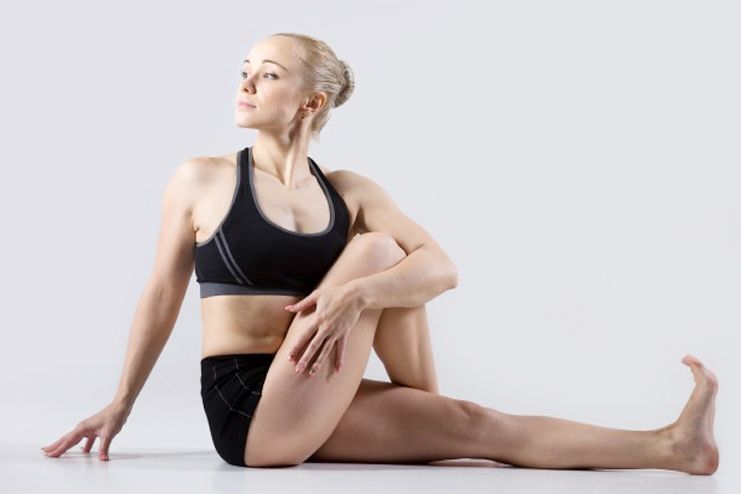
3. Ardha Matsyendrasana

Video Link:
Etymology
Ardha – Matsyendra – Asana
Ardha – half
Matsyendra – king of the fishes
Asana – yoga pose
The Ardha Matsyendrasana is one of the least talked about yoga asanas for asthma relief. Apart from being an amazing cure for asthma, it impacts the overall well being of an individual as well. It is one of those 12 yoga poses that is included in the Hatha Yoga programs. It is primarily a seated spinal yoga pose which impacts multiple functioning of the body.
How Does it Help Treat Asthma?
Doing this yoga pose is an effective cure for asthma because of the fact that it helps increase the supply of the oxygen to the lungs by expanding and opening up the chest.
How To Do?
- Place a yoga mat on the floor and sit with your legs stretched in front of you. Keep your feet together and make sure that your spine is erect and completely straight.
- Bend and bring your left leg inwards, placing your heel beside your right hip.
- Next, take your right leg over the knee.
- Place your left hand over your right knee and keep your right hand behind you.
- Following that, you need to twist your upper body which means your waist and shoulders as well as the neck towards the right and look over your right shoulder.
- Throughout the entire process, make sure that your spine is always erect.
- Hold this pose and in the meanwhile breathe in and out in regular patterns continuously.
- While breathing out, gradually bring your right hand from the behind to the front, then release your waist slowly followed by the neck and chest. Relax your entire body once that’s done.
- Repeat the entire process on the opposite side now.
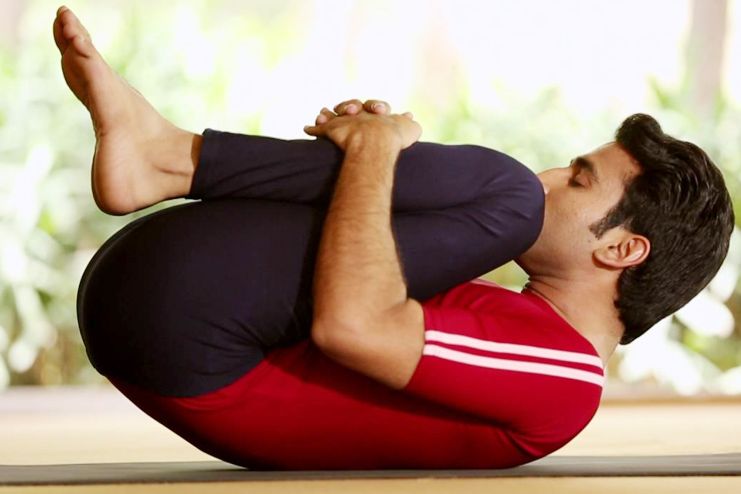
4. Pavanamuktasana

Video source:
Etymology
Pavana – Mukta – Asana
Pavana – wind
Mukta – release
Asana – yoga pose
The Pavanamuktasana is primarily an amazing remedy for reliving digestion related problems, especially indigestion and constipation. It is also an amazing pose for enhancing the overall rate of blood circulation throughout the body which helps contribute to the better supply of oxygen to all the parts of the body.
How Does it Help Treat Asthma?
Even though this yoga pose has its primary effect in the treatment for stomach related problems, it has indirect ties with treating asthma and the symptoms that come along with it. It boosts the blood circulation throughout the body which contributes in supplying the entire body with sufficient oxygen which is what averts the possibilities of asthma.
How To Do?
- Place a yoga mat on the ground.
- Lie down on the mat keeping your feet together and placing your hands by the sides of your body.
- Breathe in through your nose and as you are about to exhale, bend and pull your right knee towards your chest and place your thighs over your abdomen, keeping a tight grip on the knees with your palms placed over it.
- Hold the position and again breathe in and while you are exhaling, lift your head and your chest to touch your chin to your right knee.
- Hold this position for as long as your body permits and breathe in and out in the process.
- Make sure that your grip over the knees tightens when you are exhaling and loosens when you are inhaling the air.
- In this meanwhile, as you are exhaling, relax and let your right knee go and relax your entire body.
- Repeat the entire process with your left leg and then both legs.
- Do this 3-5 times and you are good to go.
5. Setu Bandhasana

Video Source:
Etymology
Setu – Bandha – Asana
Setu – bridge
Bandha – lock
Asana – yoga pose
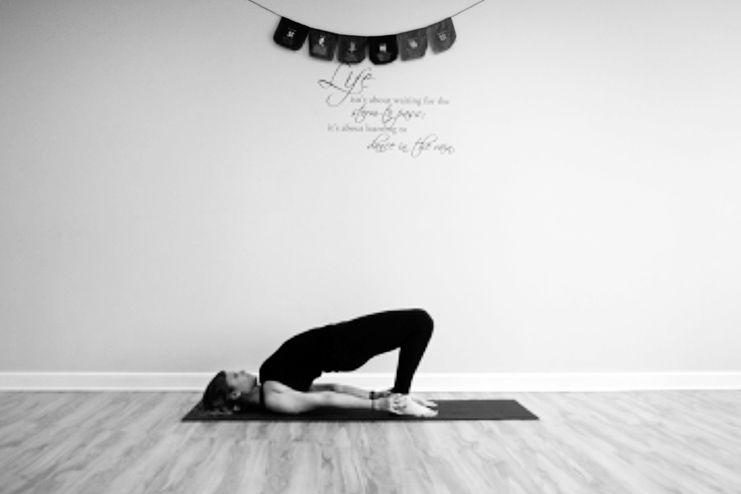
The Setu Bandhasana gets its name from how the pose resembles that of a “locked bridge”. It has numerous effects on one’s well being and is considered as one of the most amazing yoga poses to relieve asthma and problems relating to the thyroid as well. It boosts digestion and helps stretch the muscles of the back and also the chest.
How Does it Help Treat Asthma?
Continued practice of this yoga asana helps open up the lungs which ensure to help proper breathing without any kind of hindrance, thereby contributing to relieving the signs and symptoms that come associated with asthma.
How To Do?
- Place a yoga mat on the ground and lie down on it.
- Bend your knees and make sure to maintain a distance of 10-12 inches between the feet and your hips. Keep your feet joined.
- Keep your knees and the ankles in a straight line. Place your arms on either side of your body; your palms facing downwards.
- Take a deep breath in and lift your lower, middle and upper back off the floor. Keep the pressure of the body on your shoulders and touch your chest to your chin without any displacement of the chin downwards. Keep your body’s posture still on your shoulders, arms and feet.
- Firm up your bottom during this and make sure that your thighs are placed parallel with respect to the ground.
- Keep breathing during the process.
- Hold this process for as long as your body permits, preferably a minute or two.
- While you are releasing the pose, exhale.
6. Bhujangasana

Video source:
Etymology
Bhujang – Asana
Bhujang – Snake
Asana – yoga pose
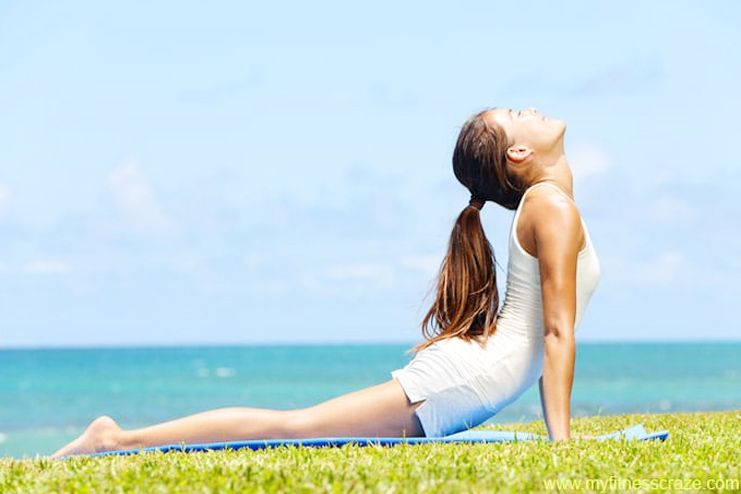
The Bhujangasana gets its name from the posture which resembles that of a cobra with its hood raised. It is an efficient asana which is part of the sequence in the Padma Sadhana and Surya Namaskar. It has varied benefits for boosting one’s overall health.
How Does it Help Treat Asthma?
Bhujangasana helps open up the shoulders and even the chest area which is beneficial in inducing better expansion of the lungs which makes breathing a lot better and easier. It also improves blood circulation throughout the body which further contributes to better oxygen supply throughout the body.
How To Do?
- Place a yoga mat on the ground and lie down on your stomach on it.
- Keep your toes flat on the ground and make sure that your forehead is placed touching the ground as well.
- Bring your feet close to each other, making sure that the feet and the heels are in slight contact.
- Place your hands along with your palms facing downwards to the ground under your shoulders. Make sure that your elbows are placed parallel to each other and in close proximity to your torso.
- Inhale and gradually lift your head, chest as well as your abdomen, making sure that your navel is touching the floor.
- Keep your breathing steady and arch your back backwards gradually and not all of a sudden.
- Following that, tilt your head in the direction of the back arch and look up.
- Keep your feet in close proximity to each other and ensure that you are consistently breathing through the entire process.
- Arch your back as much as you can and never overdo that because the same can result in affecting the back negatively.
- While exhaling, release the posture and return back to the original position with your chest, head and abdomen back to the ground.
- Do this a few more times.
7. Adho Mukha Svanasana

Video source:
Etymology
Adho – Mukha – Svana – Asana
Adho – forward
Mukha – face
Svana – dog
Asana – yoga pose
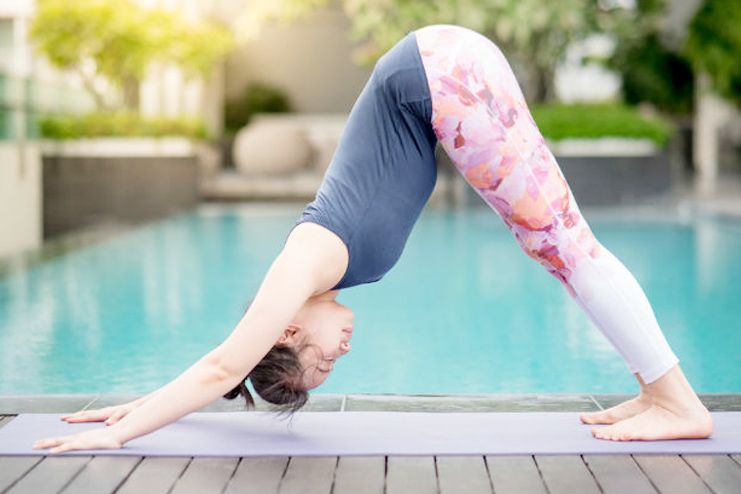
The Adho Mukha Svanasana gets its name from the posture itself which resembles a dog bending forward. It is considered as a beginner level yoga asana which has permissible benefits in a number of aspects of one’s well being. It is also performed as a part of Surya Namaskar and it is always best to warm up before doing this asana.
How Does it Help Treat Asthma?
Doing Adho Mukha Svanasana helps in not just lengthening the spine and toning the muscles, it also contributes to the overall blood circulation throughout the body. It calms the mind down and helps reduce signs of hyperventilation. The increased circulation also contributes better oxygen supply to the entire body, thereby promoting better breathing and thereby keeping the signs of asthma at bay.
How To Do?
- Place a yoga mat on the floor.
- Stay upright on it on your hands and feet, making a shape of a table in which your back will serve as the tabletop while your hands and legs are going to resemble the legs of the table.
- While exhaling, lift your hips all the while ensuring that your knees and elbows are in a complete straight line. Form an inverted “V” shape in this step.
- Your hands should be at your shoulder width apart while the same should be with your feet being hip width apart and both of them should be parallel to their counterparts.
- Press your palms into the ground and ensure to widen your shoulder blades in the process. Touch your ears to your inner arms.
- Look towards your navel and hold this pose for a few minutes. Take deep long breaths in the process.
- Exhale again and bring your hips back to the original position to resemble the pose of the table that you started this asana with.
- Relax your body and repeat this for a few more times.
8. Badhakonasana

Video source:
Etymology
Badha – Kona – Asana
Badha – restrained
Kona – angle
Asana – yoga pose
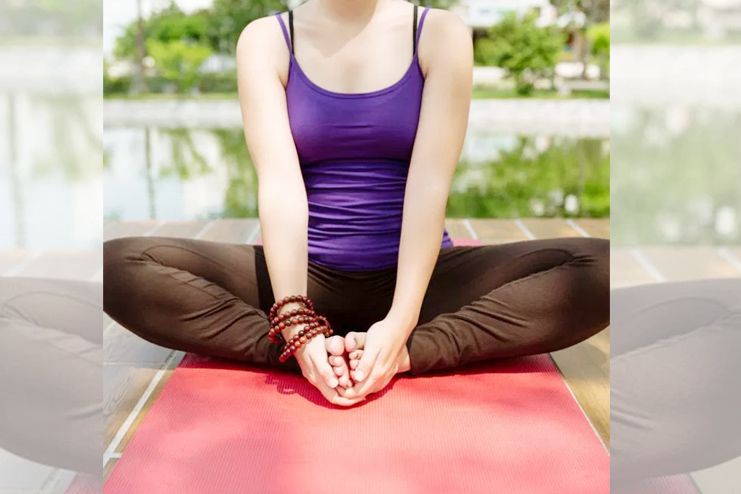
The Badhakonasana, also known as the Butterfly pose is one of the most commonly suggested yoga asanas to cure asthma. It is named so because of the appearance of the posture is much like that of a butterfly flapping its wings. Apart from that, it is also sometimes known as the cobbler pose because of its resemblance to a cobbler’s work posture.
How Does it Help Treat Asthma?
Even though it might not seem like it directly influences in relieving the signs and symptoms of asthma, it sure does indirectly boost the body’s overall well being to help cure the signs and symptoms related to asthma. It helps relieve signs of fatigue which often times contribute to degrading conditions of asthma.
How To Do?
- Place a yoga mat on the ground.
- Sit on it with your spine and entire posture straight and firm in place. Keep your legs spread out in front in a straight line.
- After that, bend both your knees and bring your feet towards your pelvis making sure that the soles of your feet are facing each other and remain in contact.
- Interlock your fingers and place them over your feet to keep them in place. You can even place your hand underneath your feet for added support.
- Put slight pressure and press your heels as close to the genitals as you can.
- Inhale through your nose and press your thighs and feet towards the ground with slight pressure.
- Following that, start with a flapping motion of the legs much like that of a butterfly. Start in a slow rhythm and gradually fasten the pace. Make sure that you are breathing normally throughout the process.
- When it starts to ache, slow down and stop to relax for a few minutes.
- To release the posture, slightly bend forward and keep your chin up and your spine erect in the process.
- Place your elbows on your thighs in a pressing motion and bring them as close to your navel as you can to feel the stretch it brings to the inner thighs. Relax the muscles following that.
- Inhale deeply and gradually bring your torso up.
- Exhale and gently release the posture and bring your legs back to your front like the initial stage.
9. Poorvottanasana

Video source:
Etymology
Poorva – Uttana – Asana
Poorva – east
Uttana – maximum stretch
Asana – yoga pose
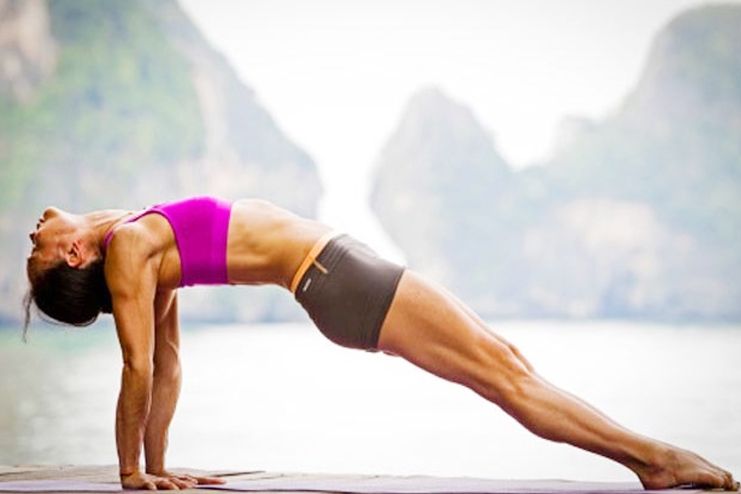
The Poorvottanasana is the kind of yoga which, in literal terms, describes the systemic flow of the pranaic subtle energies concerned around the eastern frontal side of the body. It is regarded as one of the best yoga asanas for asthma relief owing to its amazing benefits indirectly boosting the overall respiratory system of an individual.
How Does it Help Treat Asthma?
As this yoga pose directly affects one’s respiratory system and positively influences it, it is beneficial in the treatment of the respiratory disease of asthma. It boosts the activity of the lungs and aids in proper breathing mechanism which is often times what aids in the ensuring effective results in the treatment of asthma and allied problems that come with it.
How To Do?
- Place a yoga mat on the floor and sit on it.
- Spread your legs in front of you, ensuring that your feet are touching each other and your spine is erect and not bent.
- Following that, place your palms on either side of your hip, making sure that the fingers are directly away from you.
- Slightly lean back and support your body on your palms. Rest your body on your palms and breathe regularly.
- Place your body weight on your palms and lift your pelvis off the ground, making sure to keep the whole body in a straight line.
- Make sure that your knees are kept straight and not bent at odd places. Keep your feet flat to the floor.
- Hold this posture for a few minutes and relax back into the original sitting position; ensuring to exhale in the meantime.
- Repeat this posture for a few more times.
10. Savasana

Video source:
Etymology
Sava – Asana
Sava – corpse
Asana – yoga pose
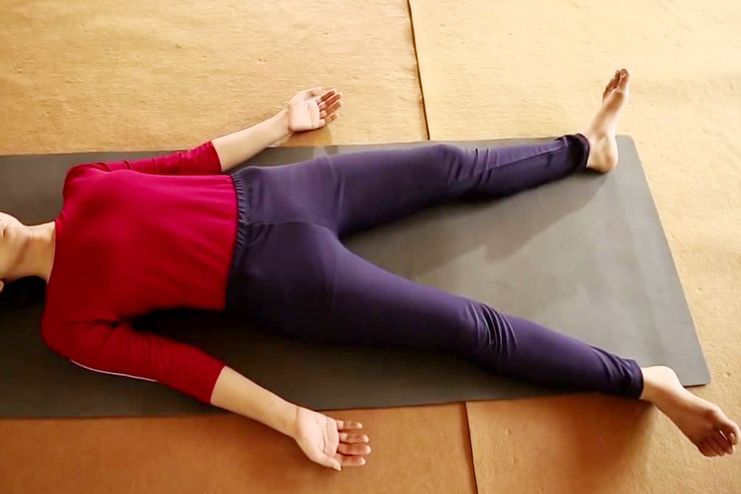
The Savasana is often considered as the concluding yoga pose that one opts for at the end of their yoga session. Because of its amazing relaxing benefits, it is considered one of the best yoga poses to keep asthma at bay. It brings the body into a meditative stage in which the body’s tissues and cells are repaired. It rejuvenates the body and makes one feel better and fresh.
How Does it Help Treat Asthma?
Savasana is very relaxing on the mind which is what helps ensure that one’s mind is completely calm and content. This is what helps contribute to ensure that one is able to breathe in and breathe out without having to strain their lungs or respiratory system. The feeling of calmness and peace also contributes to alleviating the signs and symptoms of asthma.
How To Do?
- Place a yoga mat on the growth or you can even do it without it. Avoid any kind of props like pillows etc, unless absolutely necessarily.
- Relax your entire body and spread your legs and hands a bit away from the body. Keep your palms open and facing in the upward direction.
- Slowly and gradually, relax your entire body.
- Take your attention through every part of your body, gradually relaxing every single part.
- In the meanwhile, don’t forget to breathe. With every inhalation, energise your body and with every exhalation, relax your body. One important thing is to completely surrender your body and let go of all the worries.
- After around 10-15 minutes, roll onto your side (right) and stay in that position for a few minutes making sure not to open your eyes.
- Then, after that, gradually sit up to the Sukhasana position and hold that pose for a few more minutes. Stay seated like that and then gradually open your eyes slowly without any kind of rush.
Yoga asanas for asthma relief ensure to not just cure this respiratory disease but also provides with relief on a long term basis. If you persistently do these yoga poses, chances are that you might not even need an inhaler with you at all times. Make sure to follow the steps correctly and not mess around with the process.


